Showing posts with label Bread Rolls & Pizza. Show all posts

Thursday, November 14, 2013

Dinner Rolls

Try fresh herbs, poppyseeds, or black pepper and Cheddar to give these easy dinner rolls a flavor twist.
  • 16-1/2 oz. (3-2/3 cups) all-purpose flour
  • 1/4-oz. package rapid-rise yeast
  • 1/3 cup granulated sugar
  • 1 tsp. table salt
  • 1 cup half-and-half
  • 3 oz. (6 Tbs.) unsalted butter, cut into 6 pieces; more for the pan
  • 3 large egg yolks
  • 1 oz. (2 Tbs.) unsalted butter, melted

Mix the dough:

In the bowl of a stand mixer, whisk the flour, yeast, sugar, and salt.

Poppyseed variation: If making this variation, add 1 Tbs. poppyseeds to the flour mixture now.

Fit the mixer with the dough hook. In a small saucepan over medium heat, heat the half-and-half and the 3 oz. of butter, stirring constantly, until the butter melts and the liquid registers about 120°F on an instant-read thermometer. With the mixer on medium low, pour the warm milk mixture into the dry ingredients. Add the yolks. Mix on medium low until the flour is completely incorporated, 1 to 2 min.

Cheddar & Black Pepper variation: If making this variation, add 5 oz. (about 2 cups loosely packed) finely shredded extra-sharp Cheddar and 2 tsp. coarsely ground black pepper now.

Increase the speed to medium high and knead until the dough is very smooth and elastic and pulls away from the bottom of the bowl (a little will stick to the sides), about 5 minutes.

Herb variation: If making this variation, add about 3/4 cup chopped fresh herbs (try 1/2 cup flat-leaf parsley, 1/4 cup chives, and 1 tsp. thyme) now.

If the dough climbs up the hook, stop the mixer and scrape the dough back into the bowl. Repeat as needed. Also, the mixer might dance around on the counter, so hold on to it.

No mixer? It's easy by hand: In a large bowl, whisk the flour, yeast, sugar, and salt. In a small saucepan, heat the half-and-half and the 3 oz. of butter, stirring constantly, until the butter melts and the liquid registers about 120°F on an instant-read thermometer. Make a well in the dry ingredients and pour the warm milk mixture into it. Beat the egg yolks just to combine; add them to the bowl. Mix with a wooden spoon until the flour is completely incorporated. When the dough becomes difficult to stir with a spoon, use one hand to anchor the bowl and knead with the other by pushing the dough with the heel of your hand, lifting it up, and folding it over. Knead in the bowl until the dough is no longer sticky and then turn it onto the countertop. (There’s no need to flour the counter unless you’re making the herb variation.) Continue kneading until the dough is smooth, supple, and elastic, 8 to 10 min. (Add the variation ingredients at the intervals indicated above.)

Let the dough rise:

Scrape the bowl, scoop up the dough, and shape it into a ball. Lightly grease the sides of the same bowl (or another large one) and put the dough into it. Cover the top securely with plastic. Let the covered dough rise in a warm spot until nearly doubled in size, 45 to 55 min.

Portion the dough:

Turn out the dough onto a clean surface and gently press to deflate. There's no need to flour the countertop or your hands (unless you're making the herb variation, in which case the dough may be sticky). With a pastry cutter or a chef's knife, divide the dough into about 16 equal pieces, 2 to 2-1/3 oz. each. To ensure even rolls, use a scale to weigh the portions. Lightly grease a 9x13-inch Pyrex baking dish with butter.

Shape the rolls:

Work with one piece of dough at a time; cover the others with plastic or a damp towel. There's no need to flour your hands (unless you're making the herb variation). Put one piece of dough on the counter. With a cupped palm, press down gently but firmly, rolling the piece in tight circles on the work surface until it forms a smooth-skinned ball with a seam on the bottom. Put the ball, seam side down, in the greased baking dish, cover loosely with plastic, and repeat with the remaining dough. (The dough balls can be arranged in rows or placed randomly; just be sure they're even.) Cover the baking dish with plastic and let the balls rise in a warm spot until they're about one and a half times their original size and have risen about three-quarters of the way up the pan rim (they won't yet fill the pan). This will take 40 to 60 minutes, depending on the temperature of your kitchen. Meanwhile, heat the oven to 375°F.

The shaped rolls have a tight skin on the top and a neat seam on the bottom.

Poppyseed variation: If making this variation, sprinkle on 1 tsp. poppyseeds now.

Bake the rolls:

Remove the plastic wrap and bake the rolls until they're puffed and well browned, 20 to 25 min. Remove from the oven and brush the tops with the melted butter, if you like. Serve warm.

Challah

If you like, sprinkle poppy or sesame seeds onto the braid after brushing it with egg wash; both are traditional. To easily measure the honey, first measure the oil in a 1-cup measure. The oil will coat the cup and will let the honey just slip right out.Video:Watch Maggie Glezer braid a loaf of challah step-by-step.
  • 2 tsp. instant yeast (Red Star Quick Rise, SAF Perfect Rise, Fleischmann’s Rapid Rise or Fleischmann’s Bread Machine Yeast)
  • 16-3/4 oz. (3-1/2 cups) unbleached all-purpose flour (Hecker’s, Gold Medal, or Pillsbury); more as needed
  • 1/4 cup warm water
  • 3 large eggs
  • 1/4 cup vegetable oil
  • 1/4 cup honey
  • 1-1/2 tsp. table salt
For the glaze:
  • 1 egg, lightly beaten
  • Sesame or poppy seeds for sprinkling (optional)

In a large bowl, mix the yeast with 1/2 cup of the flour. Add the warm water, stir, and let this mixture, called a sponge, sit until it starts to puff up, 15-to 20-minutes. Add the eggs, oil, honey, and salt; stir until well combined. The sponge will remain lumpy—this is fine. Add the remaining flour and mix the dough in the bowl until all the ingredients are combined. Turn the dough out onto a work surface and knead until fairly smooth, about 2 minutes. The dough should feel very firm and will be hard to knead. If it’s soft and sticky, add more flour until it’s very firm. Transfer the dough to a large, clean container and cover it well. Let it rise until doubled in bulk and very soft to the touch, about 2 hours, depending on the room temperature. Line an insulated baking sheet with parchment or oiled foil. If you don’t have an insulated sheet, stack two sheets together (this keeps the bottom of the bread from overbrowning during baking).

To shape the dough:

Turn the dough out onto a lightly floured work surface and sprinkle a little more flour over it. Spread and flatten the dough a bit, but don’t worry about punching it down. Cut it into six equal pieces. Set aside the dough pieces, cover them lightly with plastic, and brush all the flour off the work surface. Have a small bowl of water handy. Using no flour, roll a piece of dough with a rolling pin into a very thin sheet, between 1/8 and 1/4 inch thick (don’t worry about making a rectangle; an amoeba-type shape is fine). The dough may stick to the work surface; this is all right—just nudge it gently with a dough scraper. Tightly roll up the sheet like a carpet to form a strand. Roll the strand back and forth between your hands until it’s thin, very even, and 12 to 15 inches long. At the ends of the strand, angle the outer edge of your hands into the work surface as you’re rolling to make the ends pointy and the strand thicker in the middle (This will help you get a football-shaped loaf). The strand needs to grip the work surface slightly during this rolling; the “grab” will help as you roll. If the strand is too slick, very lightly dampen it with water to help it grip the work surface better. Repeat the rolling out, rolling up, and elongating steps with the remaining five pieces of dough, rolling them out to the same length. Lightly sprinkle all the strands with flour to prevent them from sticking to one another during proofing. Arrange the strands parallel to one another. At one end, gather and pinch the strands very tightly together. Weight the end with a heavy canister to keep the braid from moving and to leave your hands free, and braid closely, following the illustrations below. Lightly tap each end of the loaf with your palms to tuck it under the loaf.

how to braid challah
1. Move the second-to-the-right strand to the far-left position.
how to braid challah
2. Move the far-right strand left over two strands, to the center position (spread the strands apart to make room).
how to braid challah
3. Move the new second-to-the-left strand over to the far right position.
how to braid challah
4. Move the far-left strand (the same strand you moved in step 1) over two strands to the center position. Now repeat the steps.

Transfer the braid to the lined baking sheet and cover it loosely but thoroughly with plastic wrap. Let proof until doubled in bulk and the loaf remains indented when lightly pressed, about 2 hours, depending on room temperature. (If in doubt, let the dough proof more rather than less.)

To bake:

Position an oven rack in the lower third of the oven and heat the oven to 325°F. Just before baking, brush the dough with the beaten egg. Sprinkle with sesame seeds or poppy seeds, if using. With a thin wooden skewer, poke the bread deeply all over (the holes will prevent air pockets and help the bread keep its shape during baking). Bake for 20 minutes. Rotate the challah 180 degrees and bake until the bread is a dark, burnished brown, about another 15 minutes. (If the challah is browning too rapidly cover it loosely with foil and let it finish baking. Don’t remove the loaf too soon, as you’ll risk underbaking.) Let cool thoroughly on a rack.

Butterflake Rolls

A super buttery dough gives these rolls wonderful flavor, but what makes them irresisitible is the way they separate into fluffy layers as they bake. A must-have for Thanksgiving or Christmas Dinner.
For the dough
  • 1-1/2 cups whole milk; more as needed
  • 1 packet (1/4 oz. or 2-1/4 tsp.) instant or active dry yeast
  • 1/4 cup vegetable oil; more as needed
  • 1 oz. (2 Tbs.) unsalted butter
  • 1/4 cup granulated sugar
  • 1 lb. 7 oz. (5-1/4 cups) unbleached bread flour; more as needed
  • 1-1/4 tsp. table salt or 2 tsp. kosher salt
  • 1 large egg
For shaping and baking
  • Vegetable oil spray
  • 2 oz. (4 Tbs.) unsalted butter, melted

Make the dough

In a small saucepan, heat the milk until lukewarm (about 95°F). Remove from the heat and whisk in the yeast until it dissolves. Add the oil and butter—the butter may begin to melt, but it’s OK if it doesn’t melt completely—and then whisk in the sugar. Let rest until the yeast just begins to float to the surface, about 5 minutes.

In a stand mixer fitted with the paddle attachment (or in a large bowl), combine the flour, salt, and egg. Add the yeast mixture and mix on low speed (or with a large spoon) until a coarse ball of dough forms, about 1 minute. Let rest for 5 minutes.

Replace the paddle attachment with the dough hook and mix on medium-low speed (or knead by hand on a lightly oiled work surface) until the dough feels soft, supple, and pliable, about 3 minutes; it should feel tacky to the touch, but not sticky, and pull away from your finger when poked instead of sticking to it. If the dough is too sticky, add 1 Tbs. flour at a time, kneading to incorporate. If it’s stiff, knead in 1 Tbs. of milk at a time.

Rub a little vegetable oil on a work surface to create an 8-inch circle and put the dough on this spot. Stretch and fold the dough over itself from all four sides to the center, crimping it where the folded ends meet, to form it into a tight, round ball.

Put the dough seam side down in a lightly oiled bowl that’s twice the size of the dough. Tightly cover with plastic wrap. Let sit at room temperature until doubled in size, about 90 minutes.

Shape the rolls

Mist two 12-cup muffin tins with vegetable oil spray.

With a bench knife, divide the dough into 24 pieces, about 2 oz. each. Wipe the work surface with a damp towel or mist lightly with vegetable oil spray (don’t use flour). Form your hand into a cup by curling your fingers slightly, with your thumb snug against your index finger. Use this cupped hand to press and rotate a piece of dough as if you were trying to screw it through the dampened work surface. It should form a smooth round ball within 5 seconds and pop up into your cupped hand.

Using kitchen shears, cut through the top center of the roll, almost all the way through, leaving about 1/4-inch of dough at the bottom to hold the two halves together. Cut one of the halves twice more at 1/2-inch intervals parallel to the first cut. Repeat these cuts on the other half for a total of six sections, each about 1/2-inch wide. Place the dough, cut side up, into the prepared muffin pan. Brush the melted butter over the top and down into the cuts. Repeat with the remaining dough, placing 12 rolls into each muffin pan.

Mist the top of the rolls with vegetable oil spray and cover the pans loosely with plastic wrap. Allow the rolls to proof at room temperature until they nearly double in size, 60 to 90 minutes. The time vary depending on the temperature of the room and the dough; if you made the dough ahead and refrigerated it, the cold dough will take longer to proof. 

Position the oven racks in the upper and lower thirds of the oven. If using a convection oven, heat the oven to 350°F; if using a conventional oven, heat the oven to 375°F. Bake the rolls for 7 minutes. Rotate the tins 180 degrees and swap their placement on the racks. Continue baking until the rolls turn rich golden-brown on top, 7 to 9 minutes more. Let the rolls cool for 5 minutes before removing them from the tin.

Cloverleaf Rolls

Buttery cloverleaf rolls look like their namesake. This classic shape usually has three "leaves" but these have four, which is lucky becuase they are so good. As fun to make as they are to eat, the rolls are always welcome at Sunday dinner and at the holiday table.
For the Dough
  • 1-1/2 cups whole milk; more as needed
  • 1 packet (1/4 oz. or 2-1/4 tsp.) instant or active dry yeast
  • 1/4 cup vegetable oil; more as needed
  • 1 oz. (2 Tbs.) unsalted butter
  • 1/4 cup granulated sugar
  • 1 lb. 7 oz. (5-1/4 cups) unbleached bread flour; more as needed
  • 1-1/4 tsp. table salt or 2 tsp. kosher salt
  • 1 large egg
For shaping and baking
  • Vegetable oil spray
  • 1/4 cup all-purpose flour

Make the dough

In a small saucepan, heat the milk until lukewarm (about 95°F). Remove from the heat and whisk in the yeast until it dissolves. Add the oil and butter—the butter may begin to melt, but it’s OK if it doesn’t melt completely—and then whisk in the sugar. Let rest until the yeast just begins to float to the surface, about 5 minutes.

In a stand mixer fitted with the paddle attachment (or in a large bowl), combine the flour, salt, and egg. Add the yeast mixture and mix on low speed (or with a large spoon) until a coarse ball of dough forms, about 1 minute. Let rest for 5 minutes.

Replace the paddle attachment with the dough hook and mix on medium-low speed (or knead by hand on a lightly oiled work surface) until the dough feels soft, supple, and pliable, about 3 minutes; it should feel tacky to the touch, but not sticky, and pull away from your finger when poked instead of sticking to it. If the dough is too sticky, add 1 Tbs. flour at a time, kneading to incorporate. If it’s stiff, knead in 1 Tbs. of milk at a time.

Rub a little vegetable oil on a work surface to create an 8-inch circle and put the dough on this spot. Stretch and fold the dough over itself from all four sides to the center, crimping it where the folded ends meet, to form it into a tight, round ball.

Put the dough seam side down in a lightly oiled bowl that’s twice the size of the dough. Tightly cover with plastic wrap. Let sit at room temperature until doubled in size, about 90 minutes, or refrigerate for 1 to 4 days so that it slowly rises to double its size.

Shape and bake the rolls

Mist two 12-cup standard muffin tins with vegetable oil spray.

Put about 1/4 cup of bread or all-purpose flour in a saucer or small cup or bowl.

With a bench knife, divide the dough into 18 pieces, about 2-1/4 oz. each. Wipe the work surface with a damp towel or mist lightly with vegetable oil spray (don’t use flour). Form your hand into a cup by curling your fingers slightly, with your thumb snug against your index finger. Use this cupped hand to press and rotate a piece of dough as if you were trying to screw it through the work surface. It should form a smooth round ball within 5 seconds and pop up into your cupped hand.

Using a bench knife or kitchen shears, cut one piece of dough into 4 small pieces. Roll each quarter in the flour to lightly coat it.

Place all four pieces in one of the muffin cups to form a square. Continue with the remaining dough.

Mist the top of the rolls with vegetable oil spray and cover the pans loosely with plastic wrap. Allow the rolls to proof at room temperature until they nearly double in size, 60 to 90 minutes. The time vary depending on the temperature of the room and the dough; if you made the dough ahead and refrigerated it, the cold dough will take longer to proof.

If using a convection oven, heat the oven to 350°F; if using a conventional oven, heat the oven to 375ºF.

Bake the rolls for 7 minutes. Rotate the tins 180 degrees and swap their placement on the racks. Continue baking until the rolls turn rich golden-brown on top, 7 to 9 minutes more. Let the rolls cool for 5 minutes before removing them from the tin.

French Bread Rolls

Fresh from the oven, French bread rolls are light and airy on the inside, crisp and crackly on the outside. Though baking these is a bit of a project, it can be done in stages. Plus, the rolls freeze well and reheat beautifully.
  • 6 cups unbleached all-purpose flour; more as-needed
  • 2 Tbs. melted clarified butter, store-bought ghee, or light olive oil; more for greasing the rising bowl and plastic wrap
  • 1 package (2-1/4 tsp.) active-dry yeast
  • 2 tsp. sugar, plus a pinch for the yeast
  • 2 cups lukewarm water (about 70ºF)
  • 1-1/4 oz. (1/2 cup) dry nonfat milk
  • Scant 1 Tbs. table salt
  • A few grinds of black pepper (optional)
  • About 1 cup medium rye flour (optional; use all-purpose flour as a substitute) for dusting
  • Yellow cornmeal (preferably medium ground) for the baker’s peel or baking sheets
  • Coarse salt for sprinkling

Make the dough:

Sift the flour into a medium bowl; set aside. Brush some melted clarified butter on the interior of a large (5-qt.) bowl and one side of a piece of plastic wrap large enough to cover the bowl; set aside.

In a small bowl, stir the yeast and a pinch of sugar into 1/2 cup of the lukewarm water until dissolved. When the yeast is visibly active and bubbling, pour the remaining 1-1/2 cups lukewarm water into another large bowl. Add the 2 Tbs. clarified butter, the 2 tsp. sugar, the dry milk, salt, pepper (if using), and the dissolved yeast mixture. Add about 3 cups of the flour and stir with a wooden spoon until incorporated. Continue to add more flour (about 1/2 cup at a time) and stir until the dough comes together in a mass that leaves the sides of the bowl and is no longer easy to stir; you may not need all the flour.

With a sturdy rubber spatula, scrape the dough out onto a lightly floured work surface. Flour your hands and knead the dough until it’s perfectly smooth and elastic, 3 to 5 minutes. If the dough sticks, use your bench knife or bowl scraper to release it. Add only as much additional flour as necessary to keep the dough from sticking to your hands and the work surface.

Put the dough in the greased bowl and brush the top of the dough with melted clarified butter. Cover with the greased plastic wrap and then with a clean dishtowel. Let the dough rise in a warm, draft-free spot until doubled in volume, about 2 hours.

Uncover the bowl. Lightly flour the back of your hand and punch down the dough by giving it several swift swats. The dough will be quite sticky and spongy, so use your fingertips to help release it from the sides of the bowl, allowing it to deflate. At this point, you can either refrigerate the dough for later (see Make-Ahead Tips, below) or continue the rise. To continue the rise, turn the dough over in the bowl, cover as before, and let rise again until doubled in volume and light in texture, about 2 hours.

Shape the rolls:

Lay two clean, dry dishtowels over two baking sheets and dust them very heavily with a layer of the medium rye or all-purpose flour.

Deflate the dough by pulling it away from the sides of the bowl. Turn the dough out onto your floured work surface and gently knead the dough a few times to finish deflating. Using the blade of your bench knife or bowl scraper, cut the dough in half. Cut each half in-half again and then cut each piece into three equal pieces for a total of twelve. Cover the pieces with a clean dishtowel. Flour your hands and remove one piece of dough from under the towel, leaving the remaining pieces covered. Shape the rolls into either rounds or ovals. Cover the rolls with a clean dishtowel. Let the rolls rise, covered, until they look light and billowy, 45 minutes to 1 hour.

Set up your oven:

You want to bake your rolls as low in the oven as possible, with a metal baking pan of ice water beneath them. If you have an electric heating element on the oven floor, set an oven rack on the lowest position for the ice water pan, and position your baking stone or baking tiles on a second rack just above the pan. Otherwise, you can set your tiles or stone on the lowest oven rack and put the ice water pan directly on the floor of the oven. If you're using baking sheets instead of a stone or tiles, you may need two racks for the sheets; position them as low as possible.

Begin heating the oven to 450°F at least thirty minutes before baking. Your tiles or stone and the empty ice water pan should be in the oven as it heats; if you're baking the rolls on baking sheets, don't put them in the oven yet.

Bake the rolls:

If baking on tiles or stone, sprinkle your peel with cornmeal. Otherwise, line two large, shallow baking sheets with parchment and sprinkle them with cornmeal. Put 4 ice cubes in a 1-cup measuring cup and add enough cold water to reach the 1/4-cup mark. Set the cup next to the oven.

Gently lift the risen rolls and invert them (smooth side up) onto the prepared peel or baking sheets, but don’t remove any clinging flour from their surface. For oval rolls, use a sharp knife or a razor to make a slash from one end of the top to the other. For round rolls, use scissors to snip a crisscross in the top. Sprinkle the rolls with coarse salt.

If using tiles or a stone, lift the loaded peel by the handle and give it a little shake to make sure that the rolls aren’t sticking. Open the oven door and cover the window with a towel (to prevent contact with the ice water, which could break the window), put the peel all the way in the back of the oven over the tiles. With one swift jerk, remove the peel, leaving the rolls on the hot tiles. (It’s okay if the rolls touch when they land.) Immediately toss the ice water into the hot metal pan, remove the towel, and quickly shut the door.

If using baking sheets, put the loaded baking sheets in the oven and toss the ice water into the pan as directed in the baking-tile instructions above. If you’re using two racks, switch the positions of the sheets after the first 12 minutes of baking.

Bake the rolls at 450°F until light golden brown, 20 to 25 minutes. Reduce the heat to 400°F and bake until deep golden brown, about 5 minutes. Turn the oven off an let the rolls remain in the oven with the door closed to finish crisping for another 5 minutes. Remove the rolls from the oven and let them cool on a wire rack for at least 20 minutes.

Garlic-Parmesan Bread

Perfect alongside pastas and soups, this easy garlic and cheese mixture adds the right amount of flavor to artisan breads.   
  • 8 Tbs. (1/2 cup) salted butter, softened
  • 1/4 cup lightly packed finely grated Parmigiano-Reggiano
  • 1 Tbs. extra-virgin olive oil
  • 2 large cloves garlic, very finely minced or grated on a rasp-style grater
  • 1 tsp. finely grated lemon zest
  • Kosher salt and freshly ground black pepper
  • 1 medium loaf artisan-style bread with a tight crumb (I like wide bâtard shapes, not baguettes)

Heat the oven to 425°F.

In a food processor or a large bowl, combine the butter, Parmigiano, oil, garlic, lemon zest, 1/4 tsp. salt, and 1/8 tsp. pepper. Pulse a few times to blend but don’t overprocess or the butter might separate. If mixing by hand, mash together with a fork or a wooden spoon.

Slice the bread 1 inch thick, cutting almost but not all the way through the bottom crust, so it’s easy to pull apart. Spread a light, even coating of the butter mixture on both sides of each slice of bread. (You may not need all the butter; refrigerate any leftover for up to a week or freeze for up to three months.) Wrap the bread in foil and put the loaf on a baking sheet to catch any butter that runs out. Heat in the oven for about 15 minutes, then open the top of the foil to slightly crisp the top of the loaf, about 5 more minutes. Serve while hot.

Middle Eastern Style Lamb Pita 'Pizza'

Use the leftovers from the Braised Lamb Shanks with Garlic & Vermouth recipe to make a richly flavored topping for a weeknight pizza supper.
  • 2 Tbs. extra-virgin olive oil; more for brushing
  • 1/2 small yellow onion, finely diced (about 1/2 cup)
  • 1 medium clove garlic, finely chopped (about 1 tsp.)
  • Kosher salt
  • 1-1/2 tsp. cumin seeds, roughly chopped and toasted
  • 1/2 tsp. ground allspice
  • 1/4 tsp. crushed red pepper flakes
  • 1/4 tsp. freshly ground black pepper; more as needed
  • 3/4 cup Pomì brand chopped tomatoes with juice (or substitute canned petite-diced tomatoes)
  • 2 leftover braised lamb shanks, plus 1 Tbs. sauce (from Braised Lamb Shanks with Garlic & Vermouth)
  • 2 Tbs. roughly chopped fresh mint
  • 2 tsp. fresh lemon juice; more as needed
  • 2 regular-size (6- to 7-inch) pita pockets, split in half to form four thin rounds
  • 1/2 cup plain whole-milk yogurt

Position two oven racks in the upper and lower thirds of the oven and heat the oven to 450ºF.

Heat the olive oil in a 10-inch skillet over medium heat until just shimmering. Cook the onion and garlic in the oil with a pinch of salt, stirring occasionally, until softened, 3 to 5 minutes. Add 3/4 tsp. of the toasted cumin seeds, the allspice, red pepper flakes, and black pepper and cook, stirring, until just fragrant, about 30 seconds. Add the tomatoes and cook, stirring occasionally, until all the liquid has evaporated, 5 to 8 minutes. Remove from the heat.

Meanwhile, pull the lamb meat from the bones and cut it into chunks (you should have about 1-1/2 cups). Pulse the lamb in the food processor until it is roughly chopped, resembling the texture of very coarsely ground meat. Add the tomato sauce, lamb sauce, 1 Tbs. of the mint, the lemon juice, and 3/4 tsp. salt and pulse just to combine. Adjust the salt, pepper, and lemon juice to taste.

Put the pita halves on two baking sheets and brush them generously on both sides with olive oil. Position them with the inner sides facing up and divide the lamb mixture among the pitas, spreading it evenly over the surfaces. Bake until crisp, 5 to 10 minutes. Serve the pitas drizzled with some of the yogurt and sprinkled with the remaining toasted cumin, mint, and some freshly ground black pepper. Serve with the remaining yogurt on the side.

Knotted Dinner Rolls

Soft, rich, and worlds better than store-bought, these gorgeous, buttery dinner rolls are easier to make than you may think. In fact, describing how to shape them is more difficult than actually doing it. Look here for step-by-step photos for shaping them or watch our video on shaping and baking these dinner rolls, as well as Cloverleaf, Parker House, and Butterflake, all made with this same dough.
For the dough
  • 1-1/2 cups whole milk; more as needed
  • 1 packet (1/4 oz. or 2-1/4 tsp.) instant or active dry yeast
  • 1/4 cup vegetable oil; more as needed
  • 1 oz. (2 Tbs.) unsalted butter
  • 1/4 cup granulated sugar
  • 1 lb. 7 oz. (5-1/4 cups) unbleached bread flour; more as needed
  • 1-1/4 tsp. table salt or 2 tsp. kosher salt
  • 1 large egg
For shaping and baking
  • Vegetable oil spray
  • 1 large egg
  • Poppy or sesame seeds for garnish (optional)

Make the dough

In a small saucepan, heat the milk until lukewarm (about 95°F). Remove from the heat and whisk in the yeast until it dissolves. Add the oil and butter—the butter may begin to melt, but it’s OK if it doesn’t melt completely—and then whisk in the sugar. Let rest until the yeast just begins to float to the surface, about 5 minutes.

In a stand mixer fitted with the paddle attachment (or in a large bowl), combine the flour, salt, and egg. Add the yeast mixture and mix on low speed (or with a large spoon) until a coarse ball of dough forms, about 1 minute. Let rest for 5 minutes.

Replace the paddle attachment with the dough hook and mix on medium-low speed (or knead by hand on a lightly oiled work surface) until the dough feels soft, supple, and pliable, about 3 minutes; it should feel tacky to the touch, but not sticky, and pull away from your finger when poked instead of sticking to it. If the dough is too sticky, add 1 Tbs. flour at a time, kneading to incorporate. If it’s stiff, knead in 1 Tbs. of milk at a time.

Rub a little vegetable oil on a work surface to create an 8-inch circle and put the dough on this spot. Stretch and fold the dough over itself from all four sides to the center, crimping it where the folded ends meet, to form it into a tight, round ball.

Put the dough seam side down in a lightly oiled bowl that’s twice the size of the dough. Tightly cover with plastic wrap. Let sit at room temperature until doubled in size, about 90 minutes.

Shape the rolls
Tip:
Need help shaping your rolls? Check out our step-by-step guide on how to shape knotted dinner rolls.

Line two 13x18-inch rimmed baking sheets with parchment or nonstick baking liners and lightly mist them with vegetable oil spray.

Using a bench knife, divide the dough into eighteen pieces (about 2-1/4 oz. each).

With your hands, roll one piece into a 12-inch-long rope. If the dough starts to stick, mist your work surface lightly with vegetable oil spray or wipe it with a damp towel. Don’t use flour.

Wrap the dough around your fingers into a loose knot; there should be about 2 inches of dough free at each end. Wrap the left end of the dough up and over the loop. Wrap the right end down and under the loop. Lightly squeeze the two ends of dough together in the center to secure them.

Gently squeeze the whole piece of dough into a nice rounded shape. Put the roll, pretty side up, on a baking sheet. Repeat with the remaining dough. Mist the top of the rolls with vegetable oil spray and cover loosely with plastic wrap.

Let the rolls sit at room temperature or refrigerated until they just begin to swell, 30 minutes to 1 hour for room-temperature dough, 1 to 1-1/2 hours for refrigerated dough.

Bake the rolls

Position racks in the upper and lower thirds of the oven. If using a convection oven, heat it to 375°F; if using a conventional oven, heat it to 400°F.

Thoroughly whisk the egg with 1 Tbs. water and brush all over each roll. Sprinkle poppy or sesame seeds (if using) on the rolls.

While the oven heats, let the rolls continue to rise at room temperature, 20 to 40 minutes. They should be 1-1/2 to 2 times their original size before they go in the oven. (Once in the oven, they will rise about 20 percent more.)

Put the baking sheets in the oven and bake for 6 minutes. Rotate the sheets 180 degrees and swap their placement on the racks. Continue baking until the rolls turn rich golden-brown on top and develop some browning underneath, another 6 to 8 minutes. Let the rolls cool on the sheets or on a cooling rack for 15 minutes before serving.

Dinner Rolls

Try fresh herbs, poppyseeds, or black pepper and Cheddar to give these easy dinner rolls a flavor twist.
  • 16-1/2 oz. (3-2/3 cups) all-purpose flour
  • 1/4-oz. package rapid-rise yeast
  • 1/3 cup granulated sugar
  • 1 tsp. table salt
  • 1 cup half-and-half
  • 3 oz. (6 Tbs.) unsalted butter, cut into 6 pieces; more for the pan
  • 3 large egg yolks
  • 1 oz. (2 Tbs.) unsalted butter, melted

Mix the dough:

In the bowl of a stand mixer, whisk the flour, yeast, sugar, and salt.

Poppyseed variation: If making this variation, add 1 Tbs. poppyseeds to the flour mixture now.

Fit the mixer with the dough hook. In a small saucepan over medium heat, heat the half-and-half and the 3 oz. of butter, stirring constantly, until the butter melts and the liquid registers about 120°F on an instant-read thermometer. With the mixer on medium low, pour the warm milk mixture into the dry ingredients. Add the yolks. Mix on medium low until the flour is completely incorporated, 1 to 2 min.

Cheddar & Black Pepper variation: If making this variation, add 5 oz. (about 2 cups loosely packed) finely shredded extra-sharp Cheddar and 2 tsp. coarsely ground black pepper now.

Increase the speed to medium high and knead until the dough is very smooth and elastic and pulls away from the bottom of the bowl (a little will stick to the sides), about 5 minutes.

Herb variation: If making this variation, add about 3/4 cup chopped fresh herbs (try 1/2 cup flat-leaf parsley, 1/4 cup chives, and 1 tsp. thyme) now.

If the dough climbs up the hook, stop the mixer and scrape the dough back into the bowl. Repeat as needed. Also, the mixer might dance around on the counter, so hold on to it.

No mixer? It's easy by hand: In a large bowl, whisk the flour, yeast, sugar, and salt. In a small saucepan, heat the half-and-half and the 3 oz. of butter, stirring constantly, until the butter melts and the liquid registers about 120°F on an instant-read thermometer. Make a well in the dry ingredients and pour the warm milk mixture into it. Beat the egg yolks just to combine; add them to the bowl. Mix with a wooden spoon until the flour is completely incorporated. When the dough becomes difficult to stir with a spoon, use one hand to anchor the bowl and knead with the other by pushing the dough with the heel of your hand, lifting it up, and folding it over. Knead in the bowl until the dough is no longer sticky and then turn it onto the countertop. (There’s no need to flour the counter unless you’re making the herb variation.) Continue kneading until the dough is smooth, supple, and elastic, 8 to 10 min. (Add the variation ingredients at the intervals indicated above.)

Let the dough rise:

Scrape the bowl, scoop up the dough, and shape it into a ball. Lightly grease the sides of the same bowl (or another large one) and put the dough into it. Cover the top securely with plastic. Let the covered dough rise in a warm spot until nearly doubled in size, 45 to 55 min.

Portion the dough:

Turn out the dough onto a clean surface and gently press to deflate. There's no need to flour the countertop or your hands (unless you're making the herb variation, in which case the dough may be sticky). With a pastry cutter or a chef's knife, divide the dough into about 16 equal pieces, 2 to 2-1/3 oz. each. To ensure even rolls, use a scale to weigh the portions. Lightly grease a 9x13-inch Pyrex baking dish with butter.

Shape the rolls:

Work with one piece of dough at a time; cover the others with plastic or a damp towel. There's no need to flour your hands (unless you're making the herb variation). Put one piece of dough on the counter. With a cupped palm, press down gently but firmly, rolling the piece in tight circles on the work surface until it forms a smooth-skinned ball with a seam on the bottom. Put the ball, seam side down, in the greased baking dish, cover loosely with plastic, and repeat with the remaining dough. (The dough balls can be arranged in rows or placed randomly; just be sure they're even.) Cover the baking dish with plastic and let the balls rise in a warm spot until they're about one and a half times their original size and have risen about three-quarters of the way up the pan rim (they won't yet fill the pan). This will take 40 to 60 minutes, depending on the temperature of your kitchen. Meanwhile, heat the oven to 375°F.

The shaped rolls have a tight skin on the top and a neat seam on the bottom.

Poppyseed variation: If making this variation, sprinkle on 1 tsp. poppyseeds now.

Bake the rolls:

Remove the plastic wrap and bake the rolls until they're puffed and well browned, 20 to 25 min. Remove from the oven and brush the tops with the melted butter, if you like. Serve warm.

Cinnamon-Swirl Raisin Bread

Packed with plump, juicy raisins and rich cinnamon swirls, this easy-to-make bread is guaranteed to please, especially when slathered in Homemade Butter and served warm with a cup of freshly brewed coffee.
  • 2 cups dark raisins
  • Canola oil, for the bowl
  • 18 oz. (4 cups) unbleached all-purpose flour; more for dusting
  • 6 Tbs. granulated sugar
  • 6 Tbs. ground cinnamon
  • 1 packet (1/4 oz. or 2-1/4 tsp.) instant yeast
  • 2 tsp. fine sea salt
  • 1/2 cup whole milk
  • 1 large egg
  • 3-1/2 oz. (7 Tbs.) unsalted butter, softened; more for the pans

Make the dough:

Put the raisins in a small bowl and add enough hot tap water to cover them. Let sit for 5 minutes; drain and set aside.

Lightly oil a large bowl. In a stand mixer fitted with the dough hook, combine the flour, 2 Tbs. each of the sugar and cinnamon, the yeast, and salt. Combine on low speed, about 1 minute. Add the milk, egg, 3 Tbs. of the butter, and 3/4 cup room temperature water; mix on medium speed, scraping the bowl as necessary, until the dough comes together, about 1 minute. Increase the speed to medium high and continue to mix until the dough is smooth, slightly sticky, and clinging to the hook, about 5 minutes. Scrape down the dough hook with your hand, and remove the bowl. Gently knead in the raisins by hand, just until incorporated.

Turn the dough out onto a well-floured surface, roll it into a ball, and put it in the oiled bowl. Cover loosely with plastic wrap and let sit at room temperature until the dough looks slightly puffy, about 30 minutes.

On a well-floured surface, use your hands to flatten and spread the dough out until it’s about 3/4 inch thick. Fold the dough in half from top to bottom, then in half again from left to right. Return the dough to the bowl, cover, and let sit until it has risen slightly, about 30 minutes more.

Shape and bake:

Generously grease two 8-1/2x4-1/2-inch loaf pans with butter. In a small bowl, combine the remaining 4 Tbs. each cinnamon and sugar; set aside. In a small saucepan over low heat (or in a bowl in the microwave), melt 2 Tbs. of the butter; set aside.

On a lightly floured surface, divide the dough in half and use a rolling pin to shape each half into an 8-1/2x16-inch rectangle that's 1/4 inch thick. Use a pastry brush to spread the melted butter on the dough. Sprinkle the cinnamon-sugar mixture evenly over both rectangles.

Starting from the short side, gently roll each rectangle into an 8-1/2-inch-long cylinder. Put the cylinders in the pans, seam side down. Cover loosely with plastic wrap. Let rest at room temperature until the dough has risen slightly and springs back when pressed lightly, 1 to 1-1/2 hours.

Position a rack in the center of the oven and heat the oven to 375°F. Bake the loaves, rotating and swapping the positions of the pans halfway through baking, until dark brown and hollow-sounding when thumped on top and an instant-read thermometer inserted in the center of the loaves registers about 190°F, 30 to 35 minutes. Transfer the loaves in their pans to a rack.

In a small saucepan over low heat (or in a bowl in the microwave), melt the remaining 2 Tbs. butter. Brush the top of each loaf with the butter.
 

When cool enough to handle, remove the loaves from the pans.

Wednesday, November 13, 2013

Croissants

A "laminated" pastry dough—with less butter than you'd expect—gives this classic pastry its irresistibly flaky texture.
For the pre-ferment:
  • 3/4 cup warm water (100°F)
  • 1/8 tsp. active dry yeast
  • 9 oz. (2 cups) all-purpose flour
For the dough:
  • 1/4 cup warm water (100°F)
  • 3/4 cup milk
  • 6 Tbs. granulated sugar
  • 2 packages active dry yeast (4-1/2 tsp. total)
  • 11-1/4 oz. (2-1/2 cups) all-purpose flour
  • 1 Tbs. salt
  • 1-3/4 oz. (3-1/2 Tbs.) unsalted butter, completely softened at room temperature
  • 10 oz. (20 Tbs.) unsalted butter, chilled
For the egg wash:
  • 1 large egg, a pinch each of sugar and salt added, beaten

Mix the pre-ferment:

In a mixing bowl, stir the warm water and yeast together. Wait for them to foam, about 2 minutes. Add the flour and mix on low speed for 3 minutes with a mixer (or for about 5 minutes by hand). The dough will be sticky and somewhat lumpy. Cover and let rest at room temperature (75°F) for 12 hours, until tripled in bulk.

Make the dough:

In a small pan or bowl, combine the water and milk. Pour the liquid into a large mixing bowl and add 1 teaspoon of the sugar. Sprinkle the yeast over the warm liquid, stir to dissolve, and let sit until it starts to foam, about 2 minutes.

Add the flour, the remaining sugar, the salt, and the softened butter, along with the pre-ferment, and mix. If using a stand mixer, knead with the dough hook, stopping to push the dough down the hook. Knead until the dough pulls into a translucent sheet without tearing, about 12 minutes. (If working by hand, knead for about 15 minutes.) The dough will be soft and supple.

Croissants Recipe

Transfer the dough to a large, lightly oiled bowl and cover with plastic. Let rise at room temperature (avoid a drafty place) until doubled in bulk, about 1 hour.

Roll out the dough:

On a lightly floured surface, roll the dough into a 12x14-inch rectangle that’s 1/2 inch thick.

Transfer the dough to a baking sheet, brushing off any excess flour. Cover it with plastic and put it in the freezer until it’s as firm as chilled butter, about 30 minutes.

Pound the butter to make it pliable:

Five minutes before the dough is finished chilling, lay the cold butter between layers of plastic wrap or freezer bags. With a rolling pin, pound the butter into a 12x7-inch rectangle that’s uniformly thick. Even out and square up the rectangle with your fingers and a dough scraper.

Croissants Recipe
Seal the butter in the dough:

On a lightly floured surface, position the pounded butter on one side of the dough rectangle, lining it up parallel with the edges and leaving about 1/4-inch margin. Fold the rest of the dough over the butter. Pinch the edges to seal in the butter. Fold the pinched edges over.

Croissants Recipe
Croissants Recipe

Position the dough rectangle with the folded edge away from you. Roll the dough into a 10x20-inch rectangle that’s 1/2 inch thick.

Croissants Recipe
Fold and roll to make flaky layers

Fold one-third of the dough toward the center, brushing off excess flour as you go. Fold the other third over the two layers, brushing off flour as needed. Press an indentation in the dough after each turn to remind you how many turns you’ve made (at this point, just one). Wrap the dough in plastic and refrigerate for at least 30 minutes to let the gluten relax and the butter firm up.

Croissants Recipe

Remove the dough from the refrigerator, position it horizontally, and roll it out to a 10x20-inch rectangle. Fold, rewrap, and chill as before. Repeat this sequence once more.

Croissants Recipe
Shape and bake the croissants:

Let the dough rest for 1/2 hour, then roll it into a 19x25-inch rectangle that’s 1/8 inch thick. Trim ragged edges and slice the dough in half horizontally, leaving both halves in place.

On the upper edge of the top strip, measuring from the left corner, cut small notches every 4-1/2 inches. On the lower edge of the bottom strip, do the same thing. With a pizza cutter and a ruler, connect the upper left corner of the top strip to the first notch on the bottom strip. Continue, making parallel diagonal lines. Now connect the lower left corner of the bottom strip to the first notch on the top strip to cut a triangle; continue until you end up with 20 triangles and some scraps.

Croissants Recipe

Cut a small notch in the middle of each triangle base and dab the three corners with egg wash. The notch helps the rolled croissant curl into a crescent. Starting at the base of the triangle, pull gently so the notch separates. Fold the base over twice, 1/2 inch each time, pinching as you go.

Croissants Recipe

Roll towards the tip with your dominant hand, pulling gently at the tip with your other hand. Finish the roll so that the tip is underneath the croissant. Turn it so that the lines of the roll converge toward you, and set the croissant on a parchment-lined baking sheet; leave at least 1 inch between croissants.

Croissants Recipe

Gently curve the ends of each croissant together toward you, pinch, and brush the croissants with egg wash. (If you’re freezing the croissants, do it now.) Let them rise uncovered at room temperature until doubled in bulk, about 1 hour. Heat the oven to 375°F. Bake the croissants in the hot oven for 18 to 20 minutes or until golden brown. To check for doneness, push gently on the inner curve of the croissant. If it springs back, the croissant is thoroughly baked.

Croissants Recipe

Mini Baguettes

If you've been intimidated by the thought of baking bread, take heart: It's not hard, especially if you consider this: First, it's okay to "cheat" by working the dough in a stand mixer. Professional bakers do it all the time. Second, make it mini. This recipe yields six baguettes; that's six opportunities to practice your technique and get it right.
For best results, weigh the flour and water. This dough is very sticky, so when working with it, lightly flour your fingers and use only as much flour as you need to keep it from sticking to the work surface. If the dough sticks, use a plastic bowl scraper to loosen it and lightly flour the work surface.
  • 1 lb. (3-1/3 cups) bread flour; more for dusting
  • 2-1/2 tsp. active dry yeast
  • 1-1/2 tsp. fine sea salt (or table salt)
  • Semolina (pasta flour) or fine cornmeal for sprinkling on the baking sheet
Tip:
We tested this recipe with grocery store bread flour—King Arthur and Gold Medal brands worked fine. Artisan bread flours may have a higher protein content, which can cause them to absorb more water. If you want to experiment with them, feel free—just note that you might need to add more water to the dough than this recipe requires.

Mix the flour, yeast, and salt with a spoon in the bowl of a stand mixer. Fit the mixer with the dough hook. Weigh 12 oz. (1-1/2 cups) of lukewarm water (when you dip your finger in, it should feel neither hot nor cold) and add it to the flour mixture. Mix on medium-low speed for 1 minute. With a rubber spatula, scrape the sides and bottom of the bowl and the dough hook; the dough will be very sticky. Mix, scraping down the bowl and hook every 2 minutes, until the dough looks smooth and pulls away from the sides of the bowl, about 6 minutes more.

Remove the dough hook and scrape any dough clinging to the hook into the bowl. Using a plastic bowl scraper, scrape all the dough out of the bowl onto a lightly floured work surface. Lightly flour the dough and your fingers.

Mini Baguettes Recipe
Tip:
To get dough off your fingers, just rub them together with a little flour over the sink or garbage can.

Working around the dough, fold the edges into the middle in about 7 folds, pressing the edge down firmly into the center of the dough with your fingertips after each fold.

Mini Baguettes Recipe

Remove the dough from the work surface, using the bowl scraper to loosen it if necessary, and put it seam side down in a medium bowl. Cover with a linen or other flat-weave towel and let the dough rest in a draft-free spot until roughly doubled in size, 1 to 2 hours.

Line a large (17-1/2 x 13-inch) rimmed baking sheet with a linen or other flat-weave towel and generously flour the entire surface of the towel.

Using the bowl scraper, scrape the dough out of the bowl onto a lightly floured work surface, smooth top side down. Fold one side of the dough into the middle and press down firmly along the length of the seam. Fold in the opposite side and press again firmly along the length of the seam, forming a rectangle. Turn the dough over so the smooth side is up. With the bowl scraper, cut the dough into 6 equal pieces by making one lengthwise and two crosswise cuts. Weigh them; they should each be about 4-3/4 oz. Equal them out by cutting a bit off the heavier pieces and tucking it under the lighter pieces.

Make a line of flour on your work surface to dredge the baguettes. Working with one piece of dough at a time, put it smooth side down on a lightly floured work surface.

Tip:
Want to see this in action? Check out our video on how to shape baguettes.

Press it into a rectangle about 1/3 inch thick.

Mini Baguettes Recipe

Fold a long edge of the dough into the center, pressing firmly with your fingertips along the seam all the way down to the work surface, folding with one hand and pressing with the other, working from one end to the other. Fold the other long edge into the center in the same way.

Mini Baguettes Recipe

Continue to fold and press alternate edges until the baguette is 11 to 12 inches long, 5 to 6 folds.

Mini Baguettes Recipe

Dredge the smooth side of the dough (the seam is on top) in the line of flour.

Mini Baguettes Recipe

Set the baguette floured side up (seam down) on the towel and make a little fold in the towel to separate it from the next baguette.

Mini Baguettes Recipe

Repeat with the remaining dough, setting the baguettes on the towel with a fold separating them. Cover with a linen or other flat-weave towel and let sit until roughly doubled in size, 1 to 1-1/2 hours.

While the dough sits, position oven racks in the top and bottom thirds of the oven and heat the oven to 500°F (if you have a convection oven, use it). Have ready a small spray bottle of water.

Generously sprinkle two heavy-duty rimmed baking sheets (with or without sides) with semolina. When the baguettes are ready, carefully transfer them to the baking sheets with your hands, arranging 3 lengthwise per sheet. With a thin, very sharp knife, make 4 to 5 slashes on a sharp diagonal, 1/8 to 1/4 inch deep, on the tops of each baguette.

Open the oven and quickly spray about 10 squirts of water into the bottom and sides of the oven to make steam. Put the baguettes in the oven, spray again into the bottom and sides of the oven, and quickly close the door to trap the steam. Reduce the oven temperature to 475°F. Bake the baguettes for 6 minutes and then quickly turn them over on their baking sheets. Swap the sheets’ positions and bake for another 5 minutes.

Remove the baguettes from their baking sheets and put them scored side up directly on the oven racks (if making the baguettes ahead, don’t return them to the oven; see the box below). Bake until the baguettes are dark golden brown, about 5 minutes more. Transfer to a rack to cool.

Make-Ahead Pizza Dough

Olive oil keeps this dough tender, and a little sugar encourages browning and boosts the flavor. You can double or triple this recipe.
  • 1-3/4 cups lukewarm water (about 100°F)
  • 1 Tbs. extra-virgin olive oil
  • 2 tsp. kosher salt
  • 1-1/2 tsp. dry yeast (fast-rising or active dry)
  • 1-1/2 tsp. granulated sugar
  • 19 oz. (4-1/4 cups) unbleached all-purpose flour

Pour the water into a 3-quart bowl or large, lidded plastic food container. Using a wooden spoon, mix in the oil, salt, yeast, and sugar. Don’t worry about dissolving all of the ingredients; just stir well to combine. Don’t bother “proofing” the yeast, either—it shouldn’t fail if used before its expiration date.

Add the flour and mix until uniformly moist. The dough will be quite wet; no kneading is necessary.

Loosely cover the bowl with plastic wrap or partially cover the plastic container (leave the lid open a crack to let gases escape). Let the dough rise for 2 hours at room temperature. The dough will fully expand and may even begin to collapse within this time.

Do not punch down this dough—it will collapse on its own and later shrink while it chills in the refrigerator; it will never regain its height, and that’s OK.

Refrigerate the dough, loosely covered, for at least 3 hours before using.

Shanghai Scallion Pancakes

These pan-fried flatbreads are crisp outside, slightly flaky inside, and rich with the flavor of scallions, cilantro, and sesame. Also called Shanghai onion bread, they’re very delicious, and very addictive.
  • 4 cups (18 oz.) all-purpose flour
  • 1-1/2 cups boiling water
  • 1/4 cup toasted sesame oil
  • 2 tsp. coarse salt; more for sprinkling
  • 1/4 cup minced scallions
  • 1/4 cup minced fresh cilantro
  • 6 Tbs. sesame seeds, toasted in a dry skillet until golden
  • About 1-1/4 cups peanut oil

Put the flour in a large bowl (I use a wooden salad bowl). Add the boiling water and stir until a shaggy dough forms. Gather the scraps together, pressing and kneading to form a dough ball. Knead the dough in the bowl or on a work surface, floured if necessary, until soft but not very sticky, about 8 minutes. The dough should be light and not very resilient; when you stick your finger in, a slight indentation should remain. Cover the dough with a damp towel and let rest for 15 minutes. Knead for another 3 minutes.

Put the sesame oil in a small bowl. Shape the dough into an even cylinder. Cut the cylinder into 8 equal pieces. Use a rolling pin to roll one piece into a 6-inch round. Brush the top with the sesame oil and then sprinkle on about 1/4 tsp. salt, about 1/2 Tbs. each scallions and cilantro, and about 2 tsp. toasted sesame seeds. Roll up the pancake tightly, stretching to lengthen it slightly. Tie the ends of the cylinder around as if you were forming a knot. Flatten the knotted ball on a lightly floured surface with your palm and then roll it out again into a 6-inch round. Repeat with the remaining pieces of dough.

Shanghai Scallion Pancakes Recipe
Roll out a piece of the divided dough into a 6-inch round and brush with sesame oil. Sprinkle liberally with salt, scallions cilantro and toasted sesame seeds.
Shanghai Scallion Pancakes Recipe
Roll up the round very tightly, as you would a cigar, stretching the dough as you roll to lengthen it a bit.
Shanghai Scallion Pancakes Recipe
Tie the ends around as if you were forming a knot, but stop before one end protrudes through the center hole.
Shanghai Scallion Pancakes Recipe
Flatten the knot with your palm and then roll it out again into a 6-inch round. This creates layers of dough with the herbs pressed right in.

In a large heavy skillet, pour enough peanut oil to come to a depth of 1/4 inch. Heat the oil to 380°F (a rice noodle will puff into a curlicue within 3 seconds or a cube of bread will turn golden in 15 seconds). Fry one or two pancakes at a time until both sides are golden and slightly crisp, 2-1/2 to 3 minutes per side. Drain on paper towels and sprinkle immediately with coarse salt. Serve hot.

Shanghai Scallion Pancakes Recipe
Scallion pancakes cook to golden crispness in about 5 minutes. A sprinkling of coarse salt and they're ready to serve.

Garlic-Parmesan Bread

Perfect alongside pastas and soups, this easy garlic and cheese mixture adds the right amount of flavor to artisan breads.   
  • 8 Tbs. (1/2 cup) salted butter, softened
  • 1/4 cup lightly packed finely grated Parmigiano-Reggiano
  • 1 Tbs. extra-virgin olive oil
  • 2 large cloves garlic, very finely minced or grated on a rasp-style grater
  • 1 tsp. finely grated lemon zest
  • Kosher salt and freshly ground black pepper
  • 1 medium loaf artisan-style bread with a tight crumb (I like wide bâtard shapes, not baguettes)

Heat the oven to 425°F.

In a food processor or a large bowl, combine the butter, Parmigiano, oil, garlic, lemon zest, 1/4 tsp. salt, and 1/8 tsp. pepper. Pulse a few times to blend but don’t overprocess or the butter might separate. If mixing by hand, mash together with a fork or a wooden spoon.

Slice the bread 1 inch thick, cutting almost but not all the way through the bottom crust, so it’s easy to pull apart. Spread a light, even coating of the butter mixture on both sides of each slice of bread. (You may not need all the butter; refrigerate any leftover for up to a week or freeze for up to three months.) Wrap the bread in foil and put the loaf on a baking sheet to catch any butter that runs out. Heat in the oven for about 15 minutes, then open the top of the foil to slightly crisp the top of the loaf, about 5 more minutes. Serve while hot.

Russian Chocolate Braid

This braided sweet bread is based on a soft potato-and-sour-cream dough, filled with a thick pastry cream and flecked with mini chocolate chips. The pastry cream should be quite stiff so that it doesn't ooze out from the dough; make it just after you make the dough to allow enough time to cool.
for the pastry cream:
  • 1 cup milk
  • 2-inch piece vanilla bean, slashed lengthwise, seeds scraped out, or 1/2 tsp. pure vanilla extract
  • 1/4 cup granulated sugar
  • 3 Tbs. all-purpose flour
  • 1/4 tsp. table salt
  • 2 large egg yolks
to finish the bread:
  • 1/2 cup mini chocolate chips (semi- or bittersweet)
  • 1 large egg, beaten

Make the pastry cream:

 In a medium saucepan, warm the milk over medium heat (if you’re using a vanilla bean, add it now) just until a skin forms. Take the pan off the heat. In a medium mixing bowl, combine the sugar, flour, and salt. Add the yolks, beating with a wooden spoon. Whisk in the warm milk in a thin stream, whisking constantly. Return the milk mixture to the saucepan. Cook over medium heat, whisking constantly, until the mixture is extremely thick and gluey (you’ll need to switch to a wooden spoon), about 5 minutes. If you’re using vanilla extract, stir it in now. Immediately force the pastry cream through a sieve. Gently press a sheet of waxed paper or plastic onto the surface of the hot pastry cream to prevent a skin from forming. Let cool and then refrigerate until ready to use it.

Line a heavy baking sheet (or an insulated sheet or two sheets sandwiched together) with parchment or butter it. Roll the dough into a rectangle about 13x16 inches and about 1/8 inch thick. Stir the chilled pastry cream to soften it and then spread it over the dough in a thin layer. Scatter the chocolate chips evenly over the surface. Roll the rectangle into a cylinder from the wider side and pinch the long edge to seal. Put the cylinder on the baking sheet. Cut the cylinder in half lengthwise, splitting it into two thin strips. Arrange the strips parallel to one another so that the filling is facing up, push them together, and wrap them around each other to form a twist, working from the center.

Russian Chocolate Braid Recipe

Position a rack in the middle on the oven and heat the oven to 350°F. Cover the shaped dough and proof until it’s large, puffy, and remains indented when lightly pressed with your fingertip, about 45 minutes.

Brush the braid with the beaten egg, taking care not to smear the filling or dislodge the chocolate bits. Bake until golden brown, about 35 minutes, rotating the pan halfway through baking. Let cool on a rack for 1 hour before slicing.

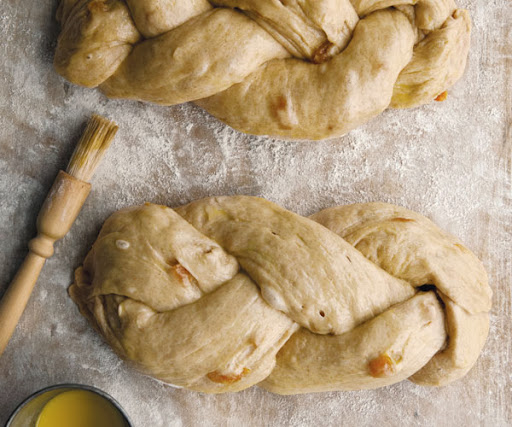
Whole Wheat Challah with Apricots

As an organic baker specializing in whole grain breads, I often wondered what challah would taste like if made with stone-ground whole wheat flour. This may sound outlandish, considering that challah is the whitest of white breads. But it makes sense if you remember that observant Jews baked and ate this bread hundreds of years ago, before millers began to sift the bran from flour, and all flour was whole wheat. So I went ahead and developed this recipe. Since I was already bucking the norm, I decided to add some chopped apricots to temper the bite of the whole wheat. Instead of braiding the dough, you may divide it and bake it in two greased 9 by 5-inch loaf pans or shape it into a round and bake it on a baking stone. Loaf pan challah is wonderful sliced and battered to make French toast. 
  • 8.47 oz. (2 cups) whole wheat flour, preferably stone-ground
  • 7.23 oz. (1-3⁄4 cups) unbleached all-purpose flour
  • 2-1⁄4 tsp. instant yeast
  • 1-1⁄2 tsp. fine sea salt or kosher salt
  • 3⁄4 cup room temperature water (70°F to 78°F)
  • 3 large eggs, at room temperature
  • 1⁄2 cup olive oil
  • 1⁄4 cup honey
  • 1⁄4 cup finely chopped dried apricots

Combine the whole wheat flour, all-purpose flour, yeast, sea salt, water, 2 of the eggs, olive oil, and honey in the bowl of a standing mixer fitted with a dough hook. Give the mixture a few turns with a rubber spatula to moisten all of the ingredients, and then knead on medium-high speed until your dough is smooth, 4 to 6 minutes. It will cling to the hook and clear the sides of the bowl. Add the apricots and knead until they’re just incorporated, another minute or two.

Transfer the dough to a lightly oiled bowl or dough-rising container, cover the bowl with plastic wrap, and let stand at room temperature until it has doubled in volume, 1-1⁄2 to 2 hours.

Gently press on the dough while it’s still in the bowl to deflate it, and then turn it onto a lightly floured countertop. Divide it into 3 equal portions and, with the palms of your hands, roll each portion into a 15-inch-long rope, just the way you used to roll clay into ropes when you were a kid.

Line a baking sheet with parchment paper and place the 3 dough ropes side by side on the sheet. Pinch the ropes together at one end, tucking them under the loaf. Braid the ropes together, right over center and then left over center, as tightly as you can, until the ropes are too short to braid. Pinch the ends of the braid together and tuck them under the loaf as you did with the other end.

Dust the loaf lightly with flour, drape with plastic wrap, and let rise at room temperature until almost doubled in volume, 1 to 2 hours (alternatively, refrigerate the covered loaf overnight and bring it to room temperature before letting it rise completely).

Heat the oven to 350°F. Lightly beat the remaining egg and brush it all over the top of the loaf. Bake the challah until the top is deep golden brown and the bottom makes a hollow sound when tapped, about 40 minutes. Transfer the bread to a wire rack to cool completely before slicing and serving. Whole Wheat Challah with Apricots will keep at room temperature in an airtight container for up to 2 days. For longer storage, freeze in a zipper-lock plastic bag for up to 1 month. To defrost, place on the countertop for an hour or two, and reheat in the oven at 350°F for 5 minutes before serving.

Simply Great Breads

Grilled Chickpea Flatbread

Mashed chickpeas keep this flatbread tender and moist; just make sure they’re well drained, or the dough will be too wet. Try this with a smoky Middle Eastern eggplant dip.
  • 1 Tbs. honey
  • 18 oz. (4 cups) unbleached all-purpose flour; more as needed
  • 2-1/4 tsp. kosher salt
  • 2 tsp. active dry yeast
  • 2 Tbs. olive oil; more for the bowl and for brushing
  • 2 tsp. cumin seeds, toasted
  • 2 tsp. coriander seeds, toasted
  • 1 small yellow onion
  • 1-1/4 cups canned chickpeas, rinsed, drained, and coarsely mashed
  • Melted butter for brushing

Dissolve the honey in 1-1/2 cups luke-warm water. Using a stand mixer fitted with the dough hook, mix the flour, 1-1/2 tsp. of the salt, and the yeast on low speed for 2 minutes. With the mixer running, gradually add the honey water and the olive oil. Increase the speed to medium and mix until the dough pulls away from the sides of the bowl and is smooth yet slightly tacky to the touch, about 5 minutes. If the dough seems too wet, add more flour, 1 tsp. at a time. Return to low speed and mix for 2 minutes more.


Let the dough rest in the bowl for 5 minutes and then turn the mixer to medium-high speed and mix for 3 minutes more, as the dough vigorously slaps against the side of the bowl.


Lightly oil a large bowl. Transfer the dough to the bowl and turn the dough to coat it with the oil. Cover with a damp cloth or plastic wrap and let the dough rise in a warm place until doubled in size, 1 to 1-1/2 hours.


Using a mortar and pestle, coarsely grind the cumin, coriander, and the remaining 3/4 tsp. salt. Set aside.


Cut the onion in half crosswise. Heat a cast-iron griddle or a small cast-iron skillet over high heat until very hot. Put the onion halves cut side down on the hot surface and cook until just charred, 5 to 7 minutes. Cool slightly and then remove the skin and chop finely. Put the onion in a medium bowl and stir in the chickpeas and about two-thirds of the spice mixture. With lightly floured hands gently deflate the dough. Add the chickpea mixture to the top of the dough, and using a plastic bowl scraper, reach down to the bottom of the bowl and gently fold the dough onto itself 4 times, rotating the bowl with each fold, to incorporate the mixture. Turn the dough out onto a lightly floured surface, stretch slightly to form into a log, and cut into 6 equal pieces. Shape each piece into a ball by gently stretching and tucking the dough underneath itself to form a “belly button” on the bottom. Gently roll in the palm of your hand to reshape into a uniform ball, then set each ball, belly button side down, on a well-floured baking sheet. Lightly brush each top with olive oil. Cover loosely with a towel or plastic wrap and let rise until doubled in size, about 1 hour.


Meanwhile, prepare a medium gas grill fire or an indirect charcoal fire with a hot zone and a cool zone (an oven thermometer placed over the hot zone should register about 450°F). Brush the grill grates with a stiff brush, then wipe with a lightly oiled paper towel.


On a lightly floured surface, roll out or press and stretch each piece of dough with your fingertips until about 1/4 inch thick and about 8 inches in diameter. Put the flatbreads on 2 lightly floured baking sheets and lightly brush the tops of the dough with the butter, being careful not to get butter on the baking sheet.


Put the flatbreads buttered side down on the grill (over the hot zone of the charcoal fire), cover, and cook until puffed and good grill marks form, 2 to 4 minutes. Flip the flatbreads and turn the burners of a gas grill down to low (or move the breads to the cool zone of the charcoal grill), and brush the grill-marked side with more butter. Cover and finish cooking until the bottoms have good grill marks and the breads are cooked through, about 3 minutes more. Transfer the breads to a cutting board, brush with more of the butter, and dust with the remaining spice mixture. Cut into wedges and serve warm.

Challah

If you like, sprinkle poppy or sesame seeds onto the braid after brushing it with egg wash; both are traditional. To easily measure the honey, first measure the oil in a 1-cup measure. The oil will coat the cup and will let the honey just slip right out.Video:Watch Maggie Glezer braid a loaf of challah step-by-step.
  • 2 tsp. instant yeast (Red Star Quick Rise, SAF Perfect Rise, Fleischmann’s Rapid Rise or Fleischmann’s Bread Machine Yeast)
  • 16-3/4 oz. (3-1/2 cups) unbleached all-purpose flour (Hecker’s, Gold Medal, or Pillsbury); more as needed
  • 1/4 cup warm water
  • 3 large eggs
  • 1/4 cup vegetable oil
  • 1/4 cup honey
  • 1-1/2 tsp. table salt
For the glaze:
  • 1 egg, lightly beaten
  • Sesame or poppy seeds for sprinkling (optional)

In a large bowl, mix the yeast with 1/2 cup of the flour. Add the warm water, stir, and let this mixture, called a sponge, sit until it starts to puff up, 15-to 20-minutes. Add the eggs, oil, honey, and salt; stir until well combined. The sponge will remain lumpy—this is fine. Add the remaining flour and mix the dough in the bowl until all the ingredients are combined. Turn the dough out onto a work surface and knead until fairly smooth, about 2 minutes. The dough should feel very firm and will be hard to knead. If it’s soft and sticky, add more flour until it’s very firm. Transfer the dough to a large, clean container and cover it well. Let it rise until doubled in bulk and very soft to the touch, about 2 hours, depending on the room temperature. Line an insulated baking sheet with parchment or oiled foil. If you don’t have an insulated sheet, stack two sheets together (this keeps the bottom of the bread from overbrowning during baking).

To shape the dough:

Turn the dough out onto a lightly floured work surface and sprinkle a little more flour over it. Spread and flatten the dough a bit, but don’t worry about punching it down. Cut it into six equal pieces. Set aside the dough pieces, cover them lightly with plastic, and brush all the flour off the work surface. Have a small bowl of water handy. Using no flour, roll a piece of dough with a rolling pin into a very thin sheet, between 1/8 and 1/4 inch thick (don’t worry about making a rectangle; an amoeba-type shape is fine). The dough may stick to the work surface; this is all right—just nudge it gently with a dough scraper. Tightly roll up the sheet like a carpet to form a strand. Roll the strand back and forth between your hands until it’s thin, very even, and 12 to 15 inches long. At the ends of the strand, angle the outer edge of your hands into the work surface as you’re rolling to make the ends pointy and the strand thicker in the middle (This will help you get a football-shaped loaf). The strand needs to grip the work surface slightly during this rolling; the “grab” will help as you roll. If the strand is too slick, very lightly dampen it with water to help it grip the work surface better. Repeat the rolling out, rolling up, and elongating steps with the remaining five pieces of dough, rolling them out to the same length. Lightly sprinkle all the strands with flour to prevent them from sticking to one another during proofing. Arrange the strands parallel to one another. At one end, gather and pinch the strands very tightly together. Weight the end with a heavy canister to keep the braid from moving and to leave your hands free, and braid closely, following the illustrations below. Lightly tap each end of the loaf with your palms to tuck it under the loaf.

how to braid challah
1. Move the second-to-the-right strand to the far-left position.
how to braid challah
2. Move the far-right strand left over two strands, to the center position (spread the strands apart to make room).
how to braid challah
3. Move the new second-to-the-left strand over to the far right position.
how to braid challah
4. Move the far-left strand (the same strand you moved in step 1) over two strands to the center position. Now repeat the steps.

Transfer the braid to the lined baking sheet and cover it loosely but thoroughly with plastic wrap. Let proof until doubled in bulk and the loaf remains indented when lightly pressed, about 2 hours, depending on room temperature. (If in doubt, let the dough proof more rather than less.)

To bake:

Position an oven rack in the lower third of the oven and heat the oven to 325°F. Just before baking, brush the dough with the beaten egg. Sprinkle with sesame seeds or poppy seeds, if using. With a thin wooden skewer, poke the bread deeply all over (the holes will prevent air pockets and help the bread keep its shape during baking). Bake for 20 minutes. Rotate the challah 180 degrees and bake until the bread is a dark, burnished brown, about another 15 minutes. (If the challah is browning too rapidly cover it loosely with foil and let it finish baking. Don’t remove the loaf too soon, as you’ll risk underbaking.) Let cool thoroughly on a rack.